Predictive Maintenance
Predictive Maintenance is a sample process in RapidMiner Studio's Samples Repository (Samples > Templates > Predictive Maintenance) designed to anticipate machine failure and to schedule maintenance pre-emptively. The Reference Data describes 136 machines characterized by their "Machine ID", 25 sensor values, and a binary label called "Failure". The Predictive Maintenance process builds a model to predict failure, and applies it to an unlabeled data set called New Data.
In what follows, we will use the Predictive Maintenance example to build two web services:
- A web service without parameters, to predict the probability of failure for all values of "Machine ID"
- A web service with a single parameter, to predict the probability of failure for a particular value of "Machine ID"
As a web service, this example is not entirely realistic, because the data source is static. In a typical web-service scenario, the input and output are constantly changing, and you need a real-time response. However, the current example has the advantage that all the steps are reproducible. You can use this example to convince yourself that your RapidMiner AI Hub setup is working as expected.
In principle, a web service can have thousands of users and be called multiple times per second. It would be absurd to rebuild the same model repeatedly. Hence, the basic strategy is to divide the original process into two:
Create and store the model for Predictive Maintenance
Retrieve the stored model and apply it to New Data to make a prediction
Remember: Building a model takes time, but once it's built and stored, you can apply it in real time. In general, a process that is designed to create a web service should not include any model building.
Copy the Predictive Maintenance folder
Let's start by making a copy of the Predictive Maintenance folder in the Samples Repository, and pasting it to a new location, so that we are free to make changes. In the steps below, we choose to store the copy in the Temporary Repository, but that choice is completely arbitrary. You can save the Predictive Maintenance folder anywhere you like.
In the RapidMiner Studio, in the Repository Panel, go to Samples > Templates > Predictive Maintenance. Right-click the folder, and choose Copy.
In the RapidMiner Studio, in the Repository Panel, go to Temporary Repository. Right-click the folder, and choose Paste. The Predictive Maintenance folder is copied to the new location, together with three files: New Data, Reference Data, and a process called Predictive Maintenance.
We will continue to work in RapidMiner Studio, in Temporary Repository > Predictive Maintenance, until all our processes and models are ready. Once everything is working in RapidMiner Studio, we will copy the Predictive Maintenance folder to the RapidMiner AI Hub Repository, and create a web service.
Store the model
To make sure that we are modifying the copied process and not the original, open the folder Temporary Repository > Predictive Maintenance, and double-click the process Predictive Maintenance, so that it is displayed in the Process Panel of RapidMiner Studio.
From the perspective of web services, the Predictive Maintenance process is flawed, because it builds a model and makes predictions without ever storing the model. To store the model, we need to include the Store Operator. Find it, and insert Store in the process, connecting the model output ("mod") of Apply Model to the input port of Store, as illustrated below:
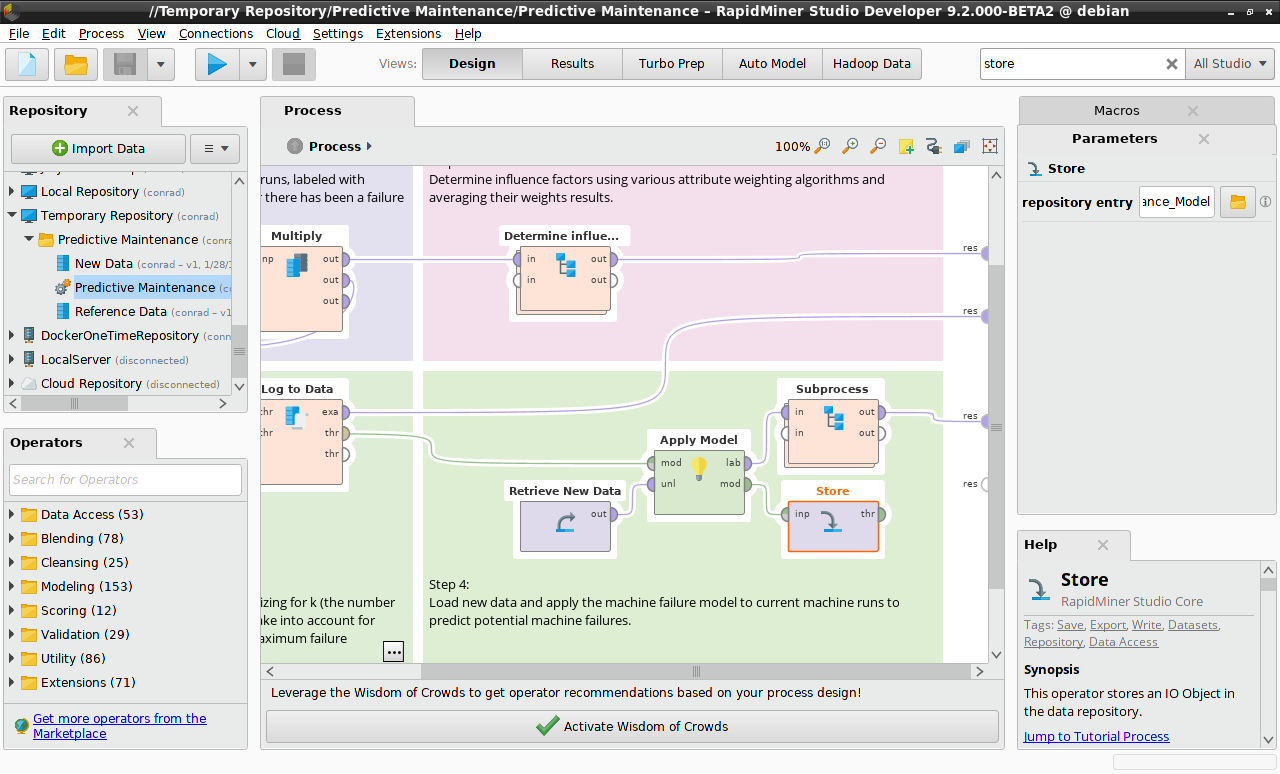
The Store Operator takes a single parameter, the location where the object is stored. In the Parameters Panel, click on the folder icon to choose a location. We want to save the model in the same folder as the data and processes we are working with. Name the model Predictive_Maintenance_Model, and make sure the checkbox for relative location is checked, so that when we later move the Predictive Maintenance folder to the RapidMiner AI Hub Repository, nothing will break.
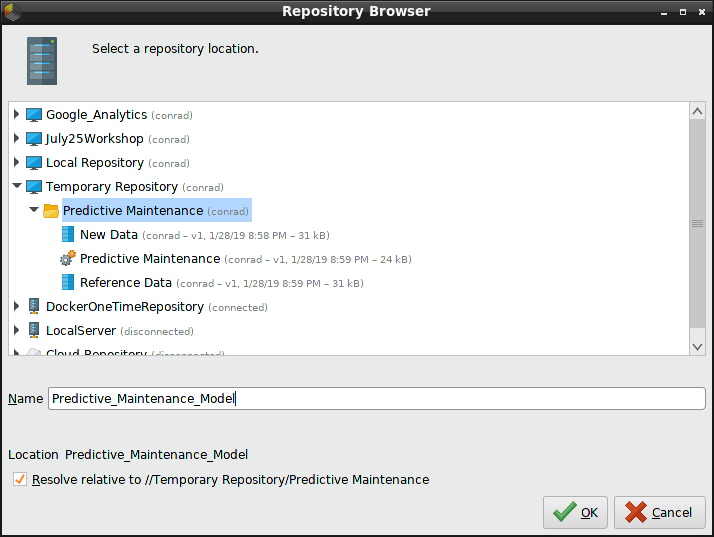
Save the process (File > Save Process), and run it to generate the model. The Predictive_Maintenance_Model now appears in the Predictive Maintenance folder.
Retrieve the model
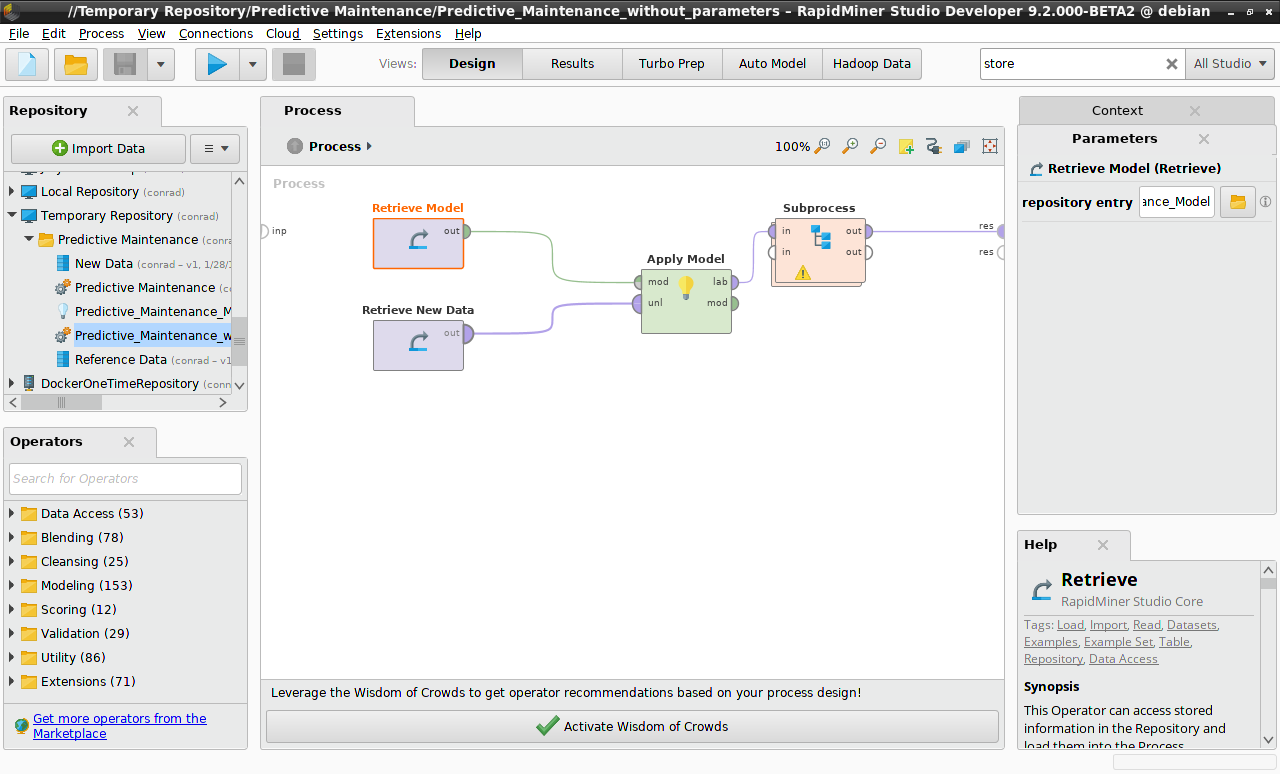
Having stored the model, we now want to create the process we will use to generate a web service. Since most of the Operators in the original Predictive Maintenance process were dedicated to building a model, we can throw them away and instead use the Retrieve Operator to load the stored model, connecting its output to the model input of Apply Model and leaving the remaining Operators as they are. In the Parameters Panel for the Retrieve Operator, click on the folder icon, and choose the Predictive_Maintenance_Model that was just created.
<?xml version="1.0" encoding="UTF-8"?><process version="9.2.000-BETA2">
  <context>
    <input/>
    <output/>
    <macros/>
  </context>
  <operator activated="true" class="process" compatibility="9.2.000-BETA2" expanded="true" name="Process">
    <parameter key="logverbosity" value="init"/>
    <parameter key="random_seed" value="2001"/>
    <parameter key="send_mail" value="never"/>
    <parameter key="notification_email" value=""/>
    <parameter key="process_duration_for_mail" value="30"/>
    <parameter key="encoding" value="SYSTEM"/>
    <process expanded="true">
      <operator activated="true" class="retrieve" compatibility="9.2.000-BETA2" expanded="true" height="68" name="Retrieve New Data" origin="GENERATED_TEMPLATE" width="90" x="112" y="136">
        <parameter key="repository_entry" value="New Data"/>
      </operator>
      <operator activated="true" class="retrieve" compatibility="9.2.000-BETA2" expanded="true" height="68" name="Retrieve Model" width="90" x="112" y="34">
        <parameter key="repository_entry" value="Predictive_Maintenance_Model"/>
      </operator>
      <operator activated="true" class="apply_model" compatibility="9.2.000-BETA2" expanded="true" height="82" name="Apply Model" origin="GENERATED_TEMPLATE" width="90" x="380" y="85">
        <list key="application_parameters"/>
        <parameter key="create_view" value="false"/>
      </operator>
      <operator activated="true" class="subprocess" compatibility="9.2.000-BETA2" expanded="true" height="82" name="Subprocess" origin="GENERATED_TEMPLATE" width="90" x="514" y="34">
        <process expanded="true">
          <operator activated="true" class="sort" compatibility="9.2.000-BETA2" expanded="true" height="82" name="Sort" origin="GENERATED_TEMPLATE" width="90" x="45" y="34">
            <parameter key="attribute_name" value="confidence(yes)"/>
            <parameter key="sorting_direction" value="decreasing"/>
          </operator>
          <operator activated="true" class="select_attributes" compatibility="9.2.000-BETA2" expanded="true" height="82" name="Select Attributes" origin="GENERATED_TEMPLATE" width="90" x="179" y="34">
            <parameter key="attribute_filter_type" value="all"/>
            <parameter key="attribute" value=""/>
            <parameter key="attributes" value=""/>
            <parameter key="use_except_expression" value="false"/>
            <parameter key="value_type" value="attribute_value"/>
            <parameter key="use_value_type_exception" value="false"/>
            <parameter key="except_value_type" value="time"/>
            <parameter key="block_type" value="attribute_block"/>
            <parameter key="use_block_type_exception" value="false"/>
            <parameter key="except_block_type" value="value_matrix_row_start"/>
            <parameter key="invert_selection" value="true"/>
            <parameter key="include_special_attributes" value="false"/>
          </operator>
          <connect from_port="in 1" to_op="Sort" to_port="example set input"/>
          <connect from_op="Sort" from_port="example set output" to_op="Select Attributes" to_port="example set input"/>
          <connect from_op="Select Attributes" from_port="example set output" to_port="out 1"/>
          <portSpacing port="source_in 1" spacing="0"/>
          <portSpacing port="source_in 2" spacing="0"/>
          <portSpacing port="sink_out 1" spacing="0"/>
          <portSpacing port="sink_out 2" spacing="0"/>
        </process>
      </operator>
      <connect from_op="Retrieve New Data" from_port="output" to_op="Apply Model" to_port="unlabelled data"/>
      <connect from_op="Retrieve Model" from_port="output" to_op="Apply Model" to_port="model"/>
      <connect from_op="Apply Model" from_port="labelled data" to_op="Subprocess" to_port="in 1"/>
      <connect from_op="Subprocess" from_port="out 1" to_port="result 1"/>
      <portSpacing port="source_input 1" spacing="0"/>
      <portSpacing port="sink_result 1" spacing="0"/>
      <portSpacing port="sink_result 2" spacing="0"/>
    </process>
  </operator>
</process>
You can build this process yourself, copying the relevant Operators from the Predictive Maintenance process, or you can import it by clicking the link above, copying the XML into a file called Predictive_Maintenance_web_service_without_parameters.rmp, and importing it into RapidMiner Studio via File > Import Process. Once you have imported it:
Right-click on the folder Temporary Repository > Predictive Maintenance, and select Store Process Here
Name the process Predictive_Maintenance_web_service_without_parameters
Double-click the new process under Predictive Maintenance to load it into RapidMiner Studio, and check that you can run it without errors. It should generate the same output as the original process Predictive Maintenance, but without the overhead of building a model.
Read more: Create a web service without parameters
Insert a macro
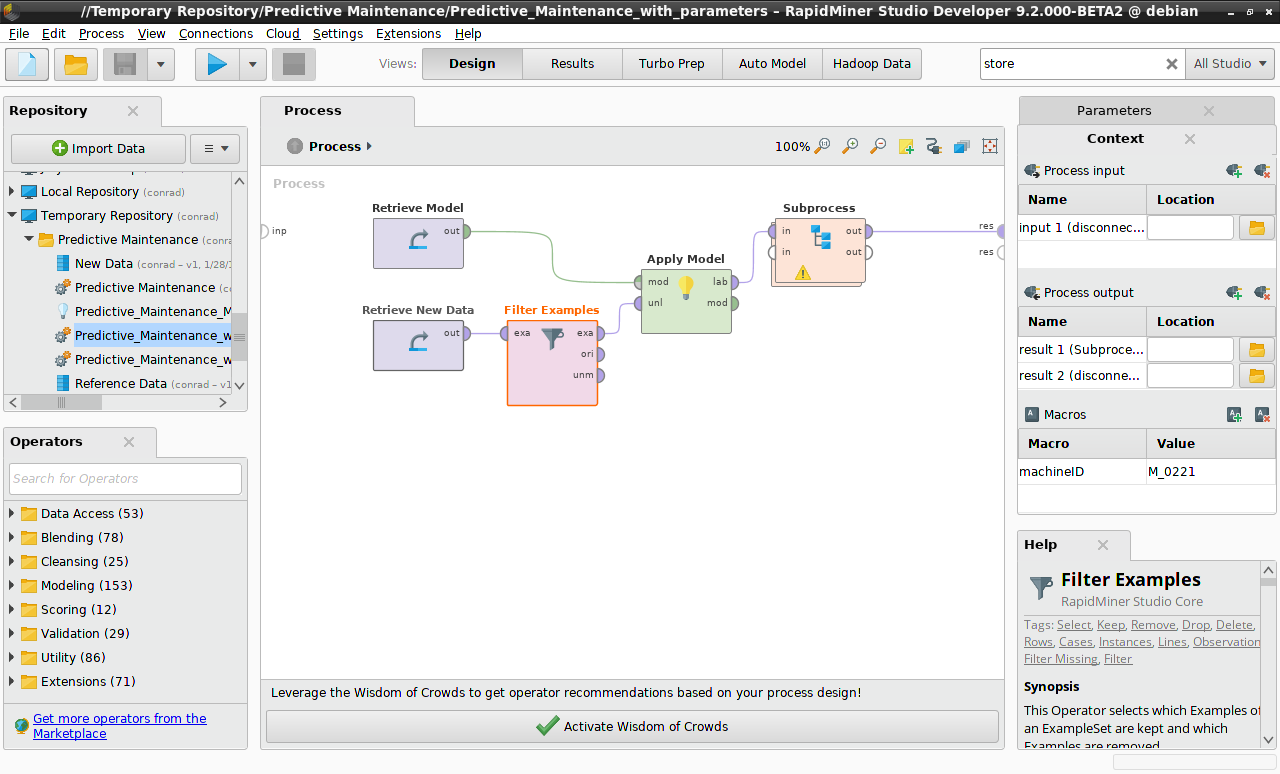
The process we just created returns predictions for every value of "Machine ID", but what if we want a prediction for only one particular value of "Machine ID"? As a first step, we can introduce another Operator, Filter Examples, inserting it between Retrieve New Data and Apply Model, and configuring it to include only that one specific value of "Machine ID".
The complication is that our web service will take a parameter corresponding to "Machine ID", and of course the user may choose an arbitrary value. We don't know the value of "Machine ID" in advance, and we don't want it to be hard-wired into our process. We do want an arbitrary value to be injected when the process is executed. What we need is a macro.
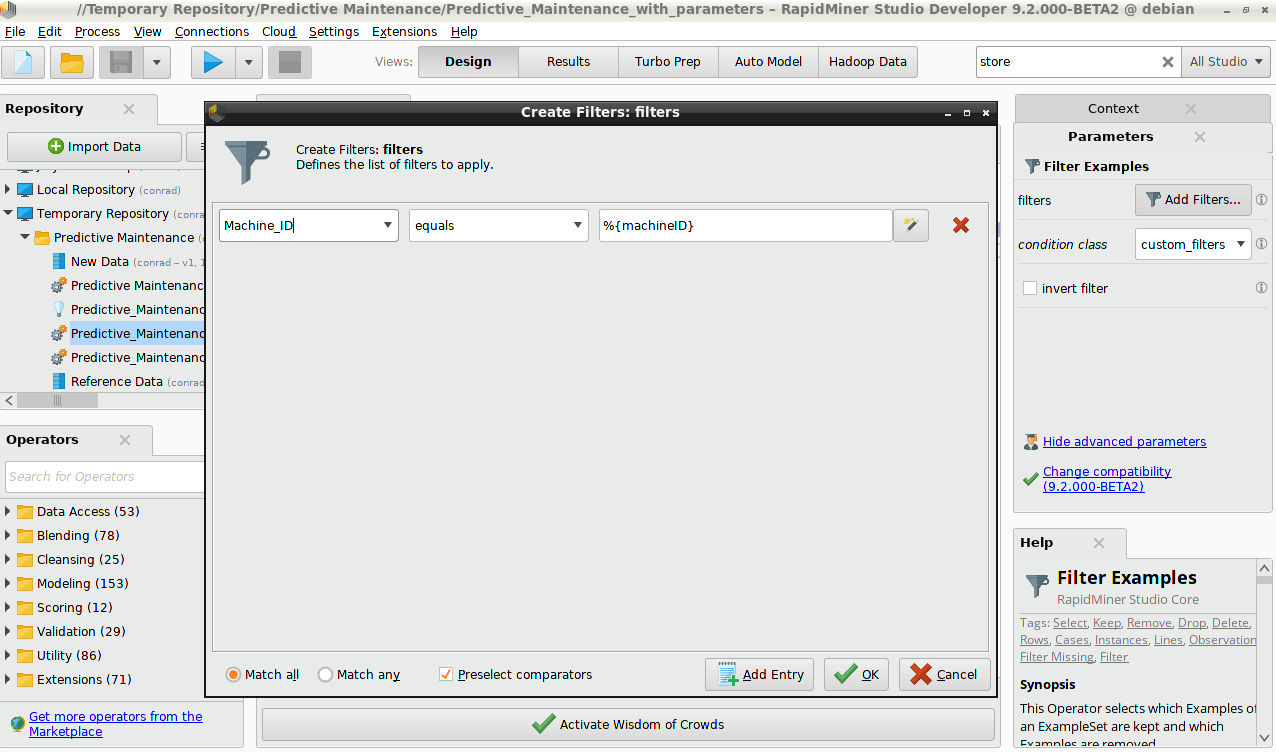
In the Parameters Panel for Filter Examples, click on the button Add Filters to display the following dialog.
Ordinarily, we might choose a filter of the form "Machine_ID equals M_0221"
to choose a specific machine, but now we will construct the filter somewhat differently.
Because a macro is a key-value pair, we need to give our macro a name (machineID);
the value will be provided later, by the web service.
The value of a macro can be injected into any field in RapidMiner that takes a value,
provided you insert the value using the following syntax:
%{machineID}
The Context Panel
At this point, we're almost done. If you've been following along, you may have already constructed the process that we will use to generate a web service with a parameter. If not, you can click the link below, copy the XML into a file called Predictive_Maintenance_web_service_with_parameters.rmp, and import it into RapidMiner Studio. As before, you should save this process in the Predictive Maintenance folder, and run the process to make sure that it works as expected.
<?xml version="1.0" encoding="UTF-8"?><process version="9.2.000-BETA2">
  <context>
    <input/>
    <output/>
    <macros>
      <macro>
        <key>machineID</key>
        <value>M_0221</value>
      </macro>
    </macros>
  </context>
  <operator activated="true" class="process" compatibility="9.2.000-BETA2" expanded="true" name="Process">
    <parameter key="logverbosity" value="init"/>
    <parameter key="random_seed" value="2001"/>
    <parameter key="send_mail" value="never"/>
    <parameter key="notification_email" value=""/>
    <parameter key="process_duration_for_mail" value="30"/>
    <parameter key="encoding" value="SYSTEM"/>
    <process expanded="true">
      <operator activated="true" class="retrieve" compatibility="9.2.000-BETA2" expanded="true" height="68" name="Retrieve New Data" origin="GENERATED_TEMPLATE" width="90" x="112" y="136">
        <parameter key="repository_entry" value="New Data"/>
      </operator>
      <operator activated="true" class="filter_examples" compatibility="9.2.000-BETA2" expanded="true" height="103" name="Filter Examples" width="90" x="246" y="136">
        <parameter key="parameter_expression" value=""/>
        <parameter key="condition_class" value="custom_filters"/>
        <parameter key="invert_filter" value="false"/>
        <list key="filters_list">
          <parameter key="filters_entry_key" value="Machine_ID.equals.%{machineID}"/>
        </list>
        <parameter key="filters_logic_and" value="true"/>
        <parameter key="filters_check_metadata" value="true"/>
      </operator>
      <operator activated="true" class="retrieve" compatibility="9.2.000-BETA2" expanded="true" height="68" name="Retrieve Model" width="90" x="112" y="34">
        <parameter key="repository_entry" value="Predictive_Maintenance_Model"/>
      </operator>
      <operator activated="true" class="apply_model" compatibility="9.2.000-BETA2" expanded="true" height="82" name="Apply Model" origin="GENERATED_TEMPLATE" width="90" x="380" y="85">
        <list key="application_parameters"/>
        <parameter key="create_view" value="false"/>
      </operator>
      <operator activated="true" class="subprocess" compatibility="9.2.000-BETA2" expanded="true" height="82" name="Subprocess" origin="GENERATED_TEMPLATE" width="90" x="514" y="34">
        <process expanded="true">
          <operator activated="true" class="sort" compatibility="9.2.000-BETA2" expanded="true" height="82" name="Sort" origin="GENERATED_TEMPLATE" width="90" x="45" y="34">
            <parameter key="attribute_name" value="confidence(yes)"/>
            <parameter key="sorting_direction" value="decreasing"/>
          </operator>
          <operator activated="true" class="select_attributes" compatibility="9.2.000-BETA2" expanded="true" height="82" name="Select Attributes" origin="GENERATED_TEMPLATE" width="90" x="179" y="34">
            <parameter key="attribute_filter_type" value="all"/>
            <parameter key="attribute" value=""/>
            <parameter key="attributes" value=""/>
            <parameter key="use_except_expression" value="false"/>
            <parameter key="value_type" value="attribute_value"/>
            <parameter key="use_value_type_exception" value="false"/>
            <parameter key="except_value_type" value="time"/>
            <parameter key="block_type" value="attribute_block"/>
            <parameter key="use_block_type_exception" value="false"/>
            <parameter key="except_block_type" value="value_matrix_row_start"/>
            <parameter key="invert_selection" value="true"/>
            <parameter key="include_special_attributes" value="false"/>
          </operator>
          <connect from_port="in 1" to_op="Sort" to_port="example set input"/>
          <connect from_op="Sort" from_port="example set output" to_op="Select Attributes" to_port="example set input"/>
          <connect from_op="Select Attributes" from_port="example set output" to_port="out 1"/>
          <portSpacing port="source_in 1" spacing="0"/>
          <portSpacing port="source_in 2" spacing="0"/>
          <portSpacing port="sink_out 1" spacing="0"/>
          <portSpacing port="sink_out 2" spacing="0"/>
        </process>
      </operator>
      <connect from_op="Retrieve New Data" from_port="output" to_op="Filter Examples" to_port="example set input"/>
      <connect from_op="Filter Examples" from_port="example set output" to_op="Apply Model" to_port="unlabelled data"/>
      <connect from_op="Retrieve Model" from_port="output" to_op="Apply Model" to_port="model"/>
      <connect from_op="Apply Model" from_port="labelled data" to_op="Subprocess" to_port="in 1"/>
      <connect from_op="Subprocess" from_port="out 1" to_port="result 1"/>
      <portSpacing port="source_input 1" spacing="0"/>
      <portSpacing port="sink_result 1" spacing="0"/>
      <portSpacing port="sink_result 2" spacing="0"/>
    </process>
  </operator>
</process>
Notice that when you run this process, the result is a prediction for a specific value of "Machine ID", because the XML process definition sets the value of the macro. Strictly speaking, there is no need to set this value. The process will run without error (albeit with no output) even without this value, and the web service will in any case reset the value, taking the value provided by the URL.
However, for testing purposes, it can be quite useful to set a value for the macro. To do so, you should open up a Context Panel, one of two non-default panels related to macros -- the other being the Macros Panel. At the bottom of the Context Panel, the current macros are listed. You can add or delete a macro via two icons on the right. You can modify the value of the macro by editing it in place. Try it! Run the process with a new value of the macro, or after deleting the key-value pair, and see how the result changes.
Read more: Create a web service with parameters
Copy the Predictive Maintenance folder to RapidMiner AI Hub
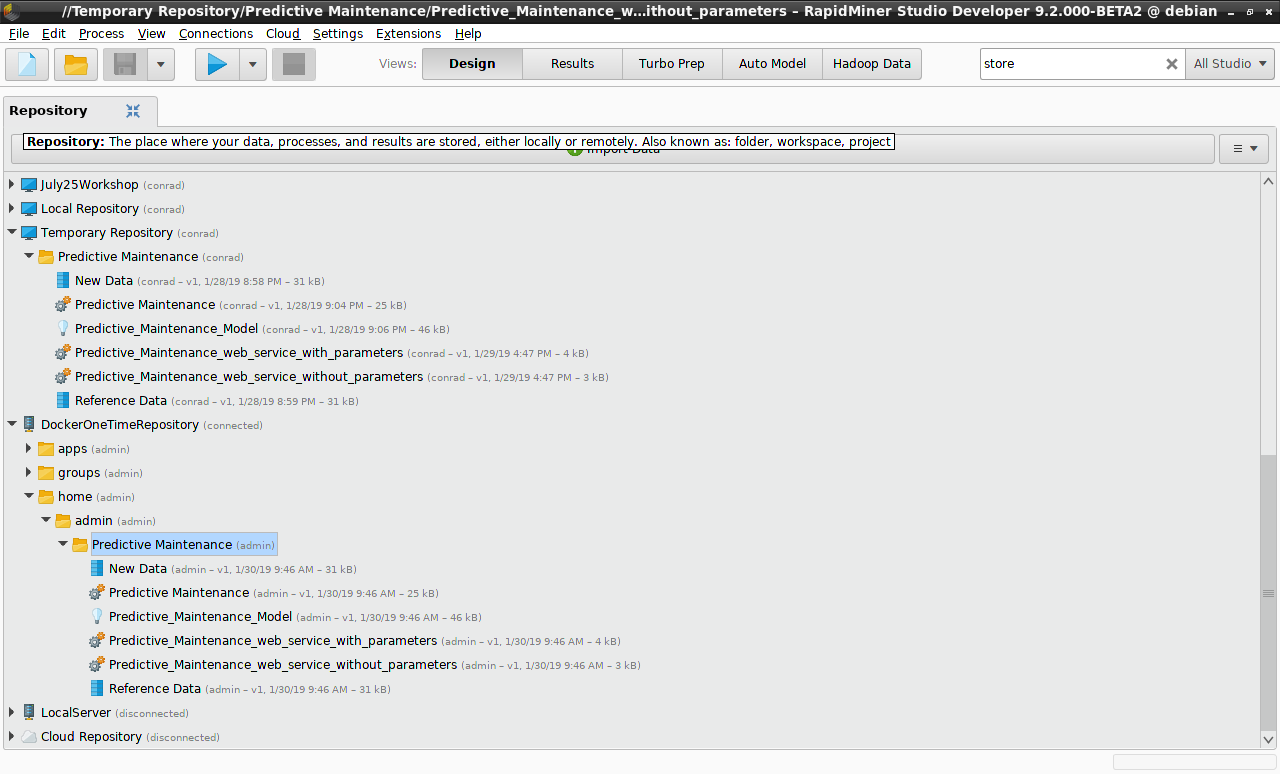
Once the model has been stored, and both new processes have been built and tested in RapidMiner Studio to see that they work, it's time to copy them to RapidMiner AI Hub. Using a similar copy/paste procedure as used previously, copy the Predictive Maintenance folder to a folder in the RapidMiner AI Hub repository. In the current example, the folder has been copied to /home/admin in the DockerOneTimeRepository. Seen from RapidMiner Studio, it looks like this:
Log in to RapidMiner AI Hub, click on Repository > Browse Repository, and continue browsing until you find the Predictive Maintenance folder. Seen from RapidMiner AI Hub, it looks like this:
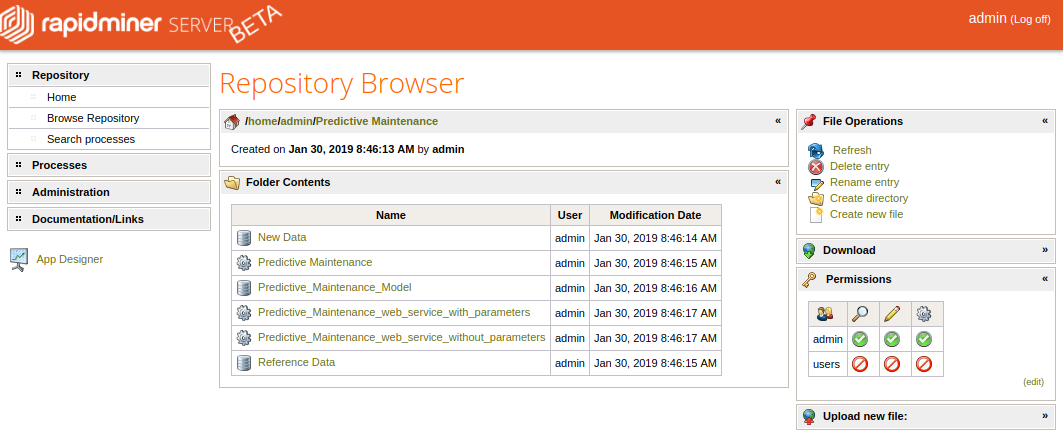
The two processes we will use to build web services are ready to go!
Next: Create a web service
